Cost-Effective AI with Ollama, GKE GPU Sharing, and vCluster
As organizations scale their AI workloads, two major challenges often emerge: the high cost of underutilized GPUs and the operational complexity of managing isolated environments for multiple teams. Traditionally, assigning a whole GPU to a single pod is inefficient, but managing separate clusters for every team is operationally heavy.
In this post, we'll demonstrate how to solve both problems by combining Google Kubernetes Engine (GKE) GPU time-sharing with vCluster for multi-tenancy. We'll deploy Ollama to serve open models (like Mistral) in isolated virtual environments that share the same physical GPU infrastructure.
The Architecture: Virtual Clusters on Shared Hardware
The architecture leverages GKE Autopilot to abstract away the physical infrastructure. Instead of managing nodes, you simply deploy workloads, and Autopilot provisions the necessary hardware on demand, including GPUs, drivers, etc.
This setup lets teams have their own isolated environments, APIs, and Ollama instances, and potentially different models, while running on the same cost-effective, shared GPU nodes. For example, Team A (e.g., Legal Research) and Team B (e.g., Customer Support) can work in separate environments while they share GPU resources.
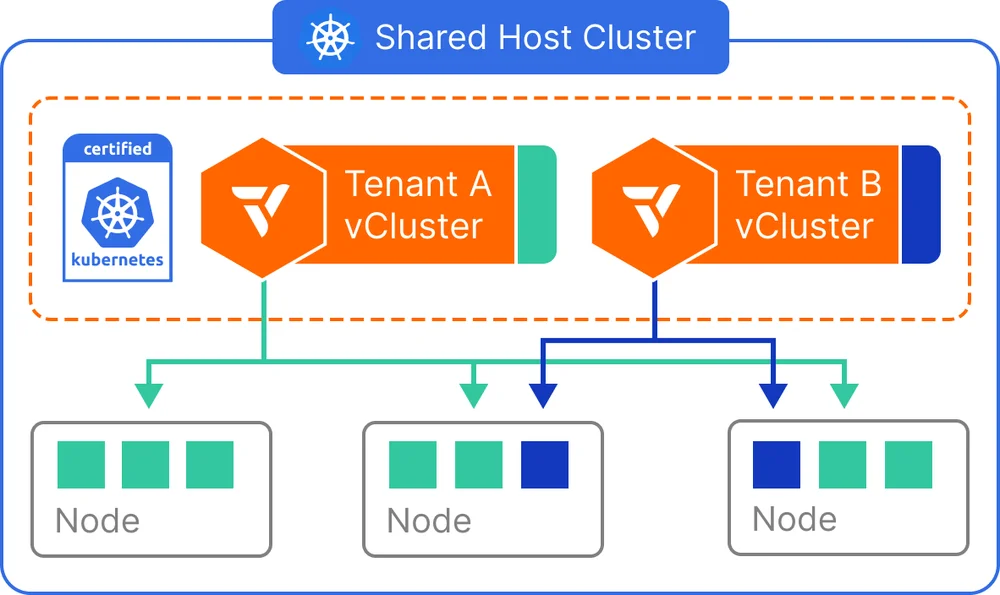
vCluster lets you create virtual Kubernetes clusters on top of an existing Kubernetes cluster. It supports various tenancy modes, including the shared nodes model that's shown in the diagram, where each virtual cluster gets its own isolated control plane while sharing the underlying worker nodes. Each virtual cluster can be accessed independently by teams who get full admin access to their cluster without interfering with others. This model also lets you leverage host cluster features when needed, and you have the ability to deploy your own controllers and CRDs inside each virtual cluster.
When you use vCluster, you can use any of these tenancy modes:
-
Shared nodes: The shared nodes mode allows multiple virtual clusters to run workloads on the same physical Kubernetes nodes. This configuration is ideal for scenarios where maximizing resource utilization is a top priority—especially for internal developer environments, CI/CD pipelines, and cost-sensitive use cases.
-
Private nodes: Using private nodes is a mode for vCluster where, instead of sharing the host cluster's worker nodes, individual worker nodes are joined to a vCluster. These private nodes act as the vCluster's worker nodes and they aren't shared with other vClusters on the same host cluster.
-
Auto nodes: You can configure vCluster to automatically provision and join worker nodes based on the node and resource requirements. To use auto nodes, you need vCluster Platform installed and vCluster needs to be connected to it.
-
Standalone: vCluster Standalone is a different architecture mode for vCluster for the control plane and node. The standalone mode doesn't require a host cluster. vCluster is deployed directly onto nodes like other Kubernetes distributions. vCluster Standalone can run on any type of node, whether it's a bare-metal node or a VM. It provides the strictest isolation for workloads because there's no shared host cluster for the control plane or worker nodes.
Deployment
To follow along on the deployment steps, make sure that you have the following installed:
Step 1: Set up and Create the GKE Autopilot Cluster
Unlike GKE Standard, we don't need to calculate node counts or configure node pools manually. Instead, we'll automatically create the cluster and then get credentials.
-
Set environment variables and create a GKE Autopilot cluster:
export PROJECT_ID=YOUR_PROJECT_ID
export REGION=YOUR_REGION_ID
# Create GKE Autopilot cluster
gcloud container clusters create-auto vcluster-gpu-sharing \
  --region=$REGION --project $PROJECT_ID
Replace
YOUR_PROJECT_IDandYOUR_REGION_IDwith the Google Cloud project and region that you want to use. -
Get the credentials to configure your local kubectl:
gcloud container clusters get-credentials vcluster-gpu-sharing \
  --region $REGION --project $PROJECT_ID
Step 2: Create Virtual Clusters (vClusters)
With the Autopilot cluster running, we can now create isolated environments for our tenants. We'll create two vClusters, demo1 and demo2. You'll need a vcluster.yaml manifest file for configuration.
When you use GKE Autopilot, it might take a few minutes to create the first vCluster. This is because vCluster waits for its own control plane pods to be up and running. Because Autopilot provisions the underlying nodes dynamically in response to this new workload, there's a brief delay while the infrastructure is initialized.
- code_block
- <ListValue: [StructValue([('code', '# Create the vcluster configuration file\r\ncat <<EOF > vcluster.yaml\r\n# Place your vCluster configuration here. \r\n# For GPU workloads on GKE Autopilot, this typically involves \r\n# enabling node synchronization so the vCluster can see the \r\n# underlying GPU nodes provided by Autopilot.\r\nsync:\r\n fromHost:\r\n ingressClasses:\r\n enabled: true\r\n nodes:\r\n enabled: true\r\n toHost:\r\n ingresses:\r\n enabled: true\r\nEOF\r\n\r\n# Create the first virtual cluster\r\nvcluster create demo1 -n demo1 -f vcluster.yaml\r\n\r\n# Create the second virtual cluster\r\nvcluster create demo2 -n demo2 -f vcluster.yaml'), ('language', ''), ('caption', <wagtail.rich_text.RichText object at 0x7ff9d076b400>)])]>
Note: If you receive an error warning that you're trying to create a vCluster inside another, select no and then switch back to the correct host context.
Step 3: Deploy Ollama to the Virtual Cluster
We start by creating the deployment manifest for Ollama. This manifest deploys Ollama and uses a Kubernetes Service to expose it on port 11434.
-
Create the deployment manifest for Ollama. This manifest deploys Ollama and it uses a Kubernetes Service to expose it on port 11434. Nodes are selected that use GPU time-sharing.
# Create Ollama deployment manifest cat <<EOF > ollama.yaml apiVersion: apps/v1 kind: Deployment metadata: name: ollama namespace: default spec: replicas: 1 selector: matchLabels: app: ollama template: metadata: labels: app: ollama spec: nodeSelector: # Selects nodes that use GPU time-sharing. # Selects nodes that allow a specific number of containers # to share the underlying GPU. # Select nodes with Nvidia L4 GPUs cloud.google.com/gke-gpu-sharing-strategy: "time-sharing" cloud.google.com/gke-max-shared-clients-per-gpu: "5" cloud.google.com/gke-accelerator: nvidia-l4 containers: - name: ollama image: ollama/ollama:latest ports: - containerPort: 11434 resources: limits: nvidia.com/gpu: 1 --- apiVersion: v1 kind: Service metadata: name: ollama namespace: default spec: selector: app: ollama ports: - port: 11434 targetPort: 11434 type: ClusterIP EOF -
When the vCluster is active, switch contexts to work inside demo1:
# Connect to the virtual cluster demo1 vcluster connect demo1 -n demo1 -
Deploy Ollama in the virtual environment:
# Apply your deployment manifest
kubectl apply -f ollama.yaml
Even though we're in a virtual cluster, when we create pods that request GPUs, the request is synced to the host. GKE Autopilot detects this requirement and automatically attaches the necessary GPU hardware to the nodes that are running your workloads.
Step 4: Pulling and Testing the Model
-
With the server running, perform the model pull and test entirely within the virtual cluster context:
# Execute the pull command inside the pod kubectl exec -it <pod-name> -- ollama pull mistral -
Verify the API:
# Port forward the Ollama service
kubectl port-forward svc/ollama 8080:11434
# Send a chat request in a new window
curl -s http://localhost:8080/api/chat \
 -H "Content-Type: application/json" \
 -d '{ "model": "mistral", "stream": false, "messages": [ {"role": "user", "content": "Explain GKE Autopilot"} ] }' | jq -r '.message.content'
Step 5: Deploy Ollama to vCluster demo2
Repeat the steps to deploy Ollama and pull the model to the second virtual cluster:
- code_block
- <ListValue: [StructValue([('code', '# Connect to the virtual cluster\r\nvcluster connect demo2 -n demo2\r\n\r\n# Apply your deployment manifest\r\nkubectl apply -f ollama.yaml\r\n\r\n# Execute the pull command inside the pod\r\nkubectl exec -it <pod-name> -- ollama pull mistral\r\n\r\n# Port forward the Ollama service\r\nkubectl port-forward svc/ollama 8080:11434\r\n\r\n# Send a chat request in a new window\r\ncurl -s http://localhost:8080/api/chat \\\r\n -H "Content-Type: application/json" \\\r\n -d \'{ "model": "mistral", "stream": false, "messages": [ {"role": "user", "content": "Explain GKE Autopilot"} ] }\' | jq -r \'.message.content\''), ('language', ''), ('caption', <wagtail.rich_text.RichText object at 0x7ff9d073bc40>)])]>
Verify the Underlying Infrastructure
Now let's switch back to the host cluster context and see what's going on.
-
Check how many nodes have been provisioned and where are the Ollama pods running:
# List the available contexts
kubectx
# Switch to the host cluster context
kubectx gke_$PROJECT_ID_$REGION_vcluster-gpu-sharing
# List nodes
Kubectl nodes
You should see two nodes. One is running the vCluster components. The other runs the Ollama instances with L4 GPUs. Your output should look like this (node names will be different):
# Output of kubectl get nodes $ kubectl get nodes NAME STATUS ROLES AGE VERSION gk3-vcluster-gpu-sharing-nap-1w88cyly-895203e4-xbqk Ready <none> 7h8m v1.33.5-gke.2072000 gk3-vcluster-gpu-sharing-pool-2-0a984fed-7mff Ready <none> 4d v1.33.5-gke.2072000 -
Check where the Ollama pods are running:
# Check the Nodes running the Ollama pods
kubectl get pods -n demo1 -o wide
kubectl get pods -n demo2 -o wide
Notice that both Ollama pods are running on the same node. This node has been provisioned by GKE Autopilot with L4 GPUs and GPU Sharing configured.
Conclusion
By using GKE Autopilot, we've removed the need to manually configure GPU node pools or time-sharing strategies. Autopilot provides resources dynamically, while vCluster ensures that Team A's Legal Research data and Team B's Customer Support bots remain completely isolated. This implementation provides a robust, low-maintenance platform for scaling AI workloads.